Как изменить Python версию Pycharm Project Package. Install, uninstall, and upgrade packages
- Как изменить Python версию Pycharm Project Package. Install, uninstall, and upgrade packages
- Pycharm не видит интерпретатор. 8 ответов
- Как обновить Python в pycharm. Install, uninstall, and upgrade packages
- Pycharm несколько версий Python. Как выбрать версию Python в PyCharm?
- Понизить версию Python. Ответ №1:
- Как поменять версию Python. Скачивание последней версии Python
- Как изменить версию Python mac. Making Python 3 Default in MacOS
- Как изменить версию Python Windows. Installing/Upgrading Python Using the Chocolatey Windows Package Manager
Как изменить Python версию Pycharm Project Package. Install, uninstall, and upgrade packages
PyCharm provides methods for installing, uninstalling, and upgrading Python packages for a particular Python interpreter. It means that each project has its own set of packages, which is considered a best practice for Python dependency management. By default, PyCharm uses pip to manage project packages. For Conda environments you can use the.
In PyCharm, you can preview and manage packages in the Python Packages tool window and in the Python interpreter Settings .
Manage packages in the Python Packages tool window
The Python Packages tool window provides the quickest and neat way to preview and install packages for the currently selected Python interpreter. This window is enabled by default, and you can find it in the lower group of the tool windows. At any time you can open it using the main menu: View | Tool Windows | Python Packages .
The Python Packages tool window shows installed packages and the packages available in the PyPI and Conda package repositories. Use the Search field to filter out the list of the available packages.
You can preview package documentation in the documentation area, or you can click the Documentation link and open the corresponding resource in a browser.
To delete an installed package, clickin the upper-right corner of the Python Package tool window.
Install packages from repositories
Start typing the package name in the Search field of the Python Package tool window. You should be able to see the number of the matching packages.
Expand the list of the available versions in the upper-right corner of the tool window. Select the required version or keep it the latest.
Click the Install with pip or Install with conda button next to the version list. Once PyCharm notifies you about successful installation, you should see the package in the list of the installed packages.
If needed, clickand provide a path to any custom repository you want to install from.
Manage package repositories
To specify a custom repository, including devpi or PyPi , clickon the Python Packages toolbar.
In the Python Packages Repositories dialog, clickto add a new repository. If no authorization is required, for example, in the case of a local repository, type the target URL and click OK .
If you want to install Python packages from a repository that requires HTTP authorization, click Basic HTTP and type the repository URL and the login credentials. Click OK to complete the task.
Once the repository is added, it appears in the list of the repositories in the Python Packages tool window.
Install packages from Version Control System
Click the Add Package link on the Python Packages toolbar and select From Version Control .
Specify a path to the target git repository. Refer tofor more information about supported path formats.
Select Install as editable (-e) if you want to install a project in editable mode (for example, setuptools develop mode ).
Pycharm не видит интерпретатор. 8 ответов
Вероятно, ваша проблема заключается в том, что вы не установили python. Это означает, что если вы используете Windows, вы не загрузили установщик для Windows, который вы можете найти на официальном сайте Python.
В случае, если у вас есть, есть вероятность, что PyCharm не сможет найти вашу установку Python, потому что она не находится в местоположении по умолчанию, обычно этоC:\Python27илиC:\Python33(для меня как минимум).
Итак, если вы установили Python и он все еще дает эту ошибку, то могут произойти две вещи:
- Вы используете
virtualenvи этотvirtualenvбыл удален или изменился путь к файлу. В этом случае вам нужно будет найти переход к следующей части этого ответа. - Ваша установка python не находится по умолчанию, и в этом случае вам нужно будет найти ее местоположение и найти файл
python.exe.
После того, как вы найдете необходимые бинарные файлы, вам нужно будет сказать, что PyCharm должны были выглядеть:
- Откройте диалог настроекCTRL+ALT+S
Затем вам нужно будет ввестиinterpreterв поле поиска:
Python Interpreter. Местоположение выбрано для вас на приведенном выше изображении. В стороне вы увидите несколько опций в виде значков, щелкните значок "Большая+, затем нажмите "local, потому что ваш интерпретатор находится на этом компьютере.
Это откроет диалоговое окно. Обязательно выберите файлpython.exeэтого каталога, не дайте pycharm весь каталог. Он просто хочет переводчика.
1
Спасибо за решение. Я просто хотел сказать, что пользователь долженhide the taskbar on windows, чтобы увидеть кнопку
William Kinaan
0
Здесь нетvirtualenv, и python также устанавливается в папку по умолчанию. Все еще была эта проблема. Ответ здесь помог мне понять, где он работает, однако мне пришлось перезапустить pycharm, чтобы внести изменения по какой-то странной причине.
DuckPuncher
0
Это не работает с Ubuntu 16.04, PyCharm edition 2017.2.1. В разделе «Интерпретатор проекта» нет даже «Python Interpreters», как показано на скриншоте.
Как обновить Python в pycharm. Install, uninstall, and upgrade packages
PyCharm provides methods for installing, uninstalling, and upgrading Python packages for a particular Python interpreter. It means that each project has its own set of packages, which is considered a best practice for Python dependency management. By default, PyCharm uses pip to manage project packages. For Conda environments you can use the conda package manager.
In PyCharm, you can preview and manage packages in the Python Packages tool window and in the Python interpreter Settings .
Manage packages in the Python Packages tool window
This tool window is available in PyCharm 2021.1 and later
The Python Packages tool window provides the quickest and neat way to preview and install packages for the currently selected Python interpreter. This window is enabled by default, and you can find it in the lower group of the tool windows. At any time you can open it using the main menu: View | Tool Windows | Python Packages .
The Python Packages tool window shows installed packages and the packages available in the PyPI and Conda package repositories. Use the Search field to filter out the list of the available packages.
You can preview package documentation in the documentation area, or you can click the Documentation link and open the corresponding resource in a browser.
To delete an installed package, click in the upper-right corner of the Python Package tool window.
Install packages from repositories
Start typing the package name in the Search field of the Python Package tool window. You should be able to see the number of the matching packages.
Expand the list of the available versions in the upper-right corner of the tool window. Select the required version or keep it the latest.
Click the Install with pip or Install with conda button next to the version list. Once PyCharm notifies you about successful installation, you should see the package in the list of the installed packages.
If needed, click and provide a path to any custom repository you want to install from.
Manage package repositories
To specify a custom repository, including devpi or PyPi, click on the Python Packages toolbar.
In the Python Packages Repositories dialog, click to add a new repository. If no authorization is required, for example, in the case of a local repository, type the target URL and click OK .
If you want to install Python packages from a repository that requires HTTP authorization, click Basic HTTP and type the repository URL and the login credentials. Click OK to complete the task.
Once the repository is added, it appears in the list of the repositories in the Python Packages tool window.
Install packages from Version Control System
Click the Add Package link on the Python Packages toolbar and select From Version Control .
Specify a path to the target git repository. Refer to pip documentation for more information about supported path formats.
Select Install as editable (-e) if you want to install a project in editable mode (for example, setuptools develop mode ).
Install packages from a local machine
Click the Add Package link on the Python Packages toolbar and select From Disk .
Specify a path to the package directory or an archive ( zip or whl ).
Manage packages in the Python interpreter settings
To manage Python packages for the Python interpreter, select the Python Interpreter page in the project Settings or select Interpreter Settings in the Python Interpreter selector on the Status bar .
If you select a Python interpreter with the configured Conda environment, the Use Conda Package Manager toggle appears in the packages area toolbar.
Install a package
Click the button on the package toolbar.
In the Available Packages dialog that opens, preview the list of the available packages and type the name of the package to install in the Search field.
Pycharm несколько версий Python. Как выбрать версию Python в PyCharm?
Вопрос:
У меня есть PyCharm 1.5.4 и использовали параметр “Открыть каталог”, чтобы открыть содержимое папки в среде IDE.
Как я могу выбрать другую версию Python (которую я уже установил на своей машине), чтобы PyCharm использовал эту версию?
Лучший ответ:
Файл → Настройки
Настройки- > Project Interpreter- > Python Interpreters
Если он не указан, добавьте его.
Ответ №1
Я думаю, вы говорите, что у вас установлены python2 и python3, и добавили ссылку на каждую версию в Pycharm > Settings > Project Interpreter
Я думаю, что вы спрашиваете, как у вас есть проекты, запущенные с Python 2 и некоторые проекты, запущенные с Python 3.
Ответ №2
Это также может произойти в Intellij Ultimate, интегрированном с PyCharm. Проблема диагностирована выше, вы выбрали неверный интерпретатор.
Точный способ исправить это для любого заданного проекта – перейти в Настройки проекта … Проект и настроить Project SDK . Вы можете добавить новый SDK проекта, если у вас нет Python 3, добавленного путем перехода к двоичному файлу python3. Это устранит ошибки, перечисленные выше. Ярлык для параметров проекта – это значок синей шахматной доски.
Вы также можете добавить Python 3 в качестве интерпретатора по умолчанию для проектов Python. В OSX это находится в Файл . Другие настройки … Структура проекта по умолчанию . Там вы можете установить Project SDK , который теперь будет применяться к каждому новому проекту. Он может быть другим на других платформах, но все же аналогичен.
Ответ №3
Идти к:
Files → Settings → Project → *"Your Project Name"* → Project Interpreter
Там вы можете увидеть, какие внешние библиотеки вы установили для python2, а какие для python3.
Выберите необходимую версию Python в соответствии с вашими требованиями.
Ответ №4
Быстрый ответ:
- Выберите желаемого
Project interpreter Apply+
File→Setting project→Project interpreter:
Ответ №5
Впоявилась новая функция, которая называется(прокрутите немного вниз). Это упрощает переключение между интерпретаторами Python и позволяет увидеть, какую версию вы используете.
Включить строку состояния
Если вы не видите строку состояния, вы можете легко активировать ее, выполнив команду “Найти действие” (Ctrl+Shift+Aили⌘+⇧+Aна компьютере Mac). Затем введите строку состояния и выберите View: Status Bar, чтобы увидеть ее.
Ответ №6
когда я использую терминал для запуска проекта, требуется Python 2.7.13:: Anaconda 4.3.0 (64-разрядная версия).
Понизить версию Python. Ответ №1:
pip uninstall python 3.8 .4
Эта команда никогда не будет работать.pipявляется менеджером пакетов python, т. Е. Для установки python pip отвечает за установку модулей для этой установки python. Он не управляет установкой самого python
К вашей ошибке при установке tensorflow:
pip install tensorflow
и
ERROR: Could not install packages due to an EnvironmentError:
Это вызвано тем фактом, чтоc:\programdataфайл защищен от записи пользователями, не являющимися администраторами, поэтому для успешного выполнения вашей команды вы должны запустить свой cmd от имени администратора.
НО :
Похоже, вы установили anaconda и пытаетесь установитьtensorflowв базовую среду с помощьюpip. Pip, в свою очередь, пытается удалить некоторый уже существующий пакет, вероятно, для выполнения требований tensorflow. Но уже существующий пакет, вероятно, установленcondaпри первой установке anaconda, поэтому вы попадаете в опасные воды и рискуете нарушить свою базовую среду, поэтому два предложения:
- Создайте новую среду
conda create -n tf tensorflow-gpu - Используйте команды conda для установки tensorflow.
Как поменять версию Python. Скачивание последней версии Python
Первый шаг должен быть вам знаком: нам необходимо обновить зеркала Ubuntu и установленные пакеты, что бы быть уверенными что мы загружаем последние версии пакетов при установке чего-либо:
Обязательные обновления:
$ sudo apt update && sudo apt upgrade -y
Установка другой версии Python на Ubuntu трубует установки целого ряда зависимых библиотек для Python. Я честно гвооря не уверен что делает половина из этого, и скорее всего это никому из нас никогда не понадобится. Но поверьте, это необходимый шаг:
Установка зависимостей Python:
$ sudo apt-get install build-essential checkinstall
$ sudo apt-get install libreadline-gplv2-dev libncursesw5-dev libssl-dev \
 libsqlite3-dev tk-dev libgdbm-dev libc6-dev libbz2-dev libffi-dev zlib1g-dev
Именно здесь многие могут начать установку Python с помощью Ubuntu package manager командой apt-get install python3.X. Мы скачаем и соберем последнюю версию Python из исходные кодов по нескольким причинам. Если версия Python достаточно свежая, некоторые машины под управлением Ubuntu могут не иметь обновленных зеркал что бы получить последнюю версию, но важнее всего то, что этот способ позволяет упростить управление несколькими версиями Python на Ubuntu.
Последнюю версию Python всегда можно найти на официальной странице с релизами на Python.org :
Первая ссылка на указанной странице должна называться Latest Python 3 Release - Python 3.X. Перейдя по ней необходимо прокрутить вниз страницы до секции «Files» и скопировать URL ссылки Gzipped source tarball.
На вашей Ubuntu машине необходимо теперь скачать эти исходные коды с помощью утилиты «wget». Ниже пример команд для скачивания заархивированной версии Python 3.9.2 в папку /opt и распаковка ее:
Скачивание Python:
$ cd /opt
$ sudo wget https://www.python.org/ftp/python/3.9.2/Python-3.9.2.tgz
$ sudo tar xzf Python-3.9.2.tgz
Теперь последняя версия Python скачана. После этого нам остается ее установить… правильно .
Как изменить версию Python mac. Making Python 3 Default in MacOS
Python users on the Mac are likely aware that Python is being deprecated from macOS 12.3 onward, and will no longer be preinstalled on the Mac. But Python remains an incredibly popular programming language, and if you rely on Python you’ll likely want to continue to have Python available in macOS. It’s easy to get Python 3 on the Mac, so let’s go a step further and show you how you can make Python 3 the new default Python version in macOS, whenever the python command is executed.
Installing Python 3 on the Mac
If you alreadyusing the official Python installer fromor, you can skip this section.
If you haven’t installed Python 3 yet it’s easy to do so with a single homebrew command:
brew install python
This will install the latest Python 3 release available through HomeBrew. Again, you can also install it using the Python 3 installer, or even theif you’d prefer.
How to Make Python 3 the Default in MacOS
We are assuming you’re using the default Zsh shell (or) and thus modifying, but if you still use bash then you’d add the alias into .bashrc instead.
- From the Terminal, open zshrc in your text editor of choice, we’ll use nano for the sake of ease:
- Add the following alias at the bottom of the .zshrc file:
- Hit Control-O and then Control-X to save the edit and then exit out of nano
nano ~/.zshrc
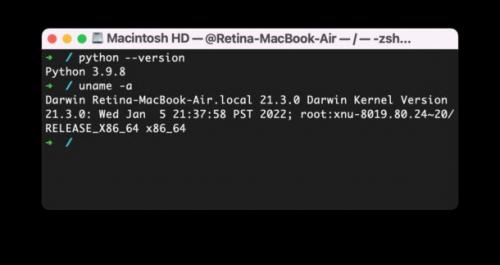
alias python=/usr/local/bin/python3
$ python --versionPython 3.9.8
This should be the same response as if you type, since the python command has been aliased to python3:
python3 --version
/usr/bin/python
Keep in mind that in future versions of MacOS, Python 2.x will no longer be bundled.
We’re using aliases here in this example, but you canlinking /usr/bin/python3 to /usr/bin/python instead if you’d prefer to go that route.
What happened to Python in MacOS?
For those who aren’t aware, Apple has been warning for a while now that Python would be deprecated from future macOS versions, and that time has finally arrived with macOS Monterey 12.3 onward. This is found in the, listed under Deprecations:
Deprecations
Thus if you are or were dependent on Python 2.7.x for any particular reason, you’ll either need to update your programs for Python 3 compatibility, maintain an older deprecated Python 2.x release (which is possible with Homebrew, etc), or rewrite everything and move on to another language entirely.
If you have any relevant thoughts, information, or experiences with Python in the latest macOS versions, share in the comments.
Как изменить версию Python Windows. Installing/Upgrading Python Using the Chocolatey Windows Package Manager
Let's say you have Python 2.7.16:
C:\Windows\system32>python --version
python2 2.7.16
…and you want to upgrade to the (now current) 3.x.y version. There is a simple way to install a parallel installation of Python 3.x.y using a Windows package management tool.
Now that modern Windows has package management, just like Debian Linux distributions have apt-get, and RedHat has dnf: we can put it to work for us! It's called Chocolatey .
What's Chocolatey?
Chocolatey is a scriptable, command line tool that is based on .NET 4.0 and the nuget package manager baked into Visual Studio.
If you want to learn about Chocolatey and why to use it, which some here reading this might find particularly useful, go to https://chocolatey.org/docs/why
Installing Chocolatey
To get the Chocolatey Package Manager, you follow a process that is described at,
I'll summarize it for you here. There are basically two options: using the cmd prompt, or using the PowerShell prompt.
CMD Prompt Chocolatey Installation
Launch an administrative command prompt. On Windows 10, to do this:
- Windows+R
- Type cmd
- PressCtrl+⇧ Shift+↵ Return
If you don't have administrator rights on the system, go to the. You may not be completely out of luck and can perform a limited local install, but I won't cover that here.