Web Scraping in 2023. 7 Best Python Web Scraping Libraries in 2023
Web Scraping in 2023. 7 Best Python Web Scraping Libraries in 2023
Struggling to find the best Python web scraping library to use? You aren't alone. Settling for a scraping library can get pretty troublesome if it fails because it's slow or easily detected by anti-bots.
A good Python library for web scraping should be fast, scalable and capable of crawling any type of web page. In this article, we'll discuss the seven best options, their pros and cons, as well as some quick examples to help you understand how they work.
What Are the Best Python Web Scraping Libraries
We did some background tests to check and verify which Python web scraping library is capable of scraping a web page without problems.
The best ones are the best ones:
- .
- .
- .
- .
- .
- .
Let's go into detail and discuss these libraries with some Python web scraping examples. We'll extract the product details on the Vue Storefront with each.
1. ZenRows
Click to open the image in full screen
API is a Python web scraping library capable of solving the biggest scraping problem: getting blocked. Its features include rotating and premium proxies, a headless browser, geo-targeting, JavaScript rendering, and more. Using ZenRows saves you frustration, time and resources.
Pros:
- ZenRows is easy to use.
- It can efficiently bypass CAPTCHAs and anti-bots.
- It offers smart rotating proxies.
- It can scrape JavaScript-rendered pages.
- It also works with other libraries.
Cons:
- It's a paid service, but it comes with a free trial.
How to scrape a web page with ZenRows
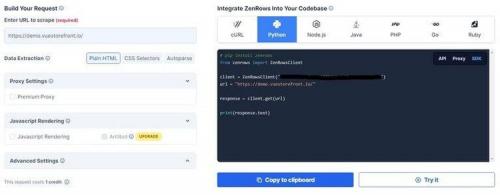
Step 1: Generate the Python code
Create a free ZenRows account and navigate to the dashboard to get started. From the dashboard, select Python and enter the target website's URL.
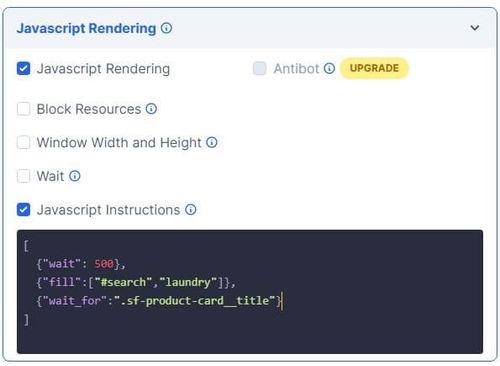
Click to open the image in full screen
Since our target web page is dynamically generated, activate the JavaScript rendering option and select JavaScript instructions from the options shown. For this example, you need to include the "fill" key, which is a list with the ID of the search box ("#search") and the word "laundry".
Web Scraping blog. Basic overview
You can install Scrapy using pip . Be careful though, the Scrapy documentation strongly suggests to install it in a dedicated virtual environment in order to avoid conflicts with your system packages.
Hence, I'm using Virtualenv and Virtualenvwrapper:
mkvirtualenv scrapy_env
Now we can simply install Scrapy ….
pip install Scrapy
…. and bootstrap our Scrapy project withstartproject
scrapy startproject product_scraper
This will create all the necessary boilerplate files for the project.
├── product_scraper
│ ├── __init__.py
│ ├── items.py
│ ├── middlewares.py
│ ├── pipelines.py
│ ├── settings.py
│ └── spiders
│ ├── __init__.py
└── scrapy.cfg
Here is a brief overview of these files and folders:
- items.py is a model for the extracted data. You can define custom model (like a product) that will inherit the Scrapy Item class.
- middlewares.py is used to change the request / response lifecycle. For example you could create a middleware to rotate user-agents, or to use an API like ScrapingBee instead of doing the requests yourself.
- pipelines.py is used to process the extracted data, clean the HTML, validate the data, and export it to a custom format or save it to a database.
- /spiders is a folder containing Spider classes. With Scrapy, Spiders are classes that define how a website should be scraped, including what link to follow and how to extract the data for those links.
- scrapy.cfg is the configuration file for the project's main settings.
Источник: https://lajfhak.ru-land.com/novosti/state-web-scraping-2023-challenges-web-scraping
Playwright Scraping. Web Scraping With Playwright: Tutorial for 2022
You most probably won’t get surprised if we tell you that in recent years, the internet and its impact have grown tremendously. This can be attributed to the growth of the technologies that help create more user-friendly applications. Moreover, there is more and more automation at every step – from the development to the testing of web applications.
Having good tools to test web applications is crucial. Libraries such as Playwright help speed up processes by opening the web application in a browser and other user interactions such as clicking elements, typing text, and, of course, extracting public data from the web.
In this post, we’ll explain everything you need to know about Playwright and how it can be used for automation and even web scraping.
What is Playwright?
Playwright is a testing and automation framework that can automate web browser interactions. Simply put, you can write code that can open a browser. This means that all the web browser capabilities are available for use. The automation scripts can navigate to URLs, enter text, click buttons, extract text, etc. The most exciting feature of Playwright is that it can work with multiple pages at the same time, without getting blocked or having to wait for operations to complete in any of them.
It supports most browsers such as Google Chrome, Microsoft Edge using Chromium, Firefox. Safari is supported when using WebKit. In fact, cross-browser web automation is Playwright’s strength. The same code can be efficiently executed for all the browsers. Moreover, Playwright supports various programming languages such as Node.js, Python, Java, and .NET. You can write the code that opens websites and interacts with them using any of these languages.
Playwright’s documentation is extensive. It covers everything from getting started to a detailed explanation about all the classes and methods.
Support for proxies in Playwright
Playwright supports the use of proxies. Before we explore this subject further, here is a quick code snippet showing how to start using a proxy with Chromium:
Node.js:
const { chromium } = require ( 'playwright' ); "
const browser = await chromium . launch ();
Python:
from playwright . async_api import async_playwright
import asyncio
with async_playwright () as p :
browser = await p . chromium . launch ()
This code needs only slight modifications to fully utilize proxies.
In the case of Node.js, the launch function can accept an optional parameter of LauchOptions type. This LaunchOption object can, in turn, send several other parameters, e.g., headless . The other parameter needed is proxy . This proxy is another object with properties such as server , username , password , etc. The first step is to create an object where these parameters can be specified.
// Node.js
const launchOptions = {
proxy : {
server : 123.123.123.123 : 80 '
},
headless : false
}
The next step is to pass this object to the launch function:
const browser = await chromium . launch ( launchOptions );
In the case of Python, it’s slightly different. There’s no need to create an object of LaunchOptions . Instead, all the values can be sent as separate parameters. Here’s how the proxy dictionary will be sent:
# Python
proxy_to_use = {
'server' : '123.123.123.123:80'
}
browser = await pw .
When deciding on which proxy to use, it’s best to use residential proxies as they don’t leave a footprint and won’t trigger any security alarms. For example, our own Oxylabs’ Residential Proxies can help you with an extensive and stable proxy network. You can access proxies in a specific country, state, or even a city. What’s essential, you can integrate them easily with Playwright as well.
Basic scraping with Playwright
Let’s move to another topic where we’ll cover how to get started with Playwright using Node.js and Python.
Playwright Extract Text. Step 1: Locate Elements and Extract Text
In our first use case, we'll start with something simple to explore crawling options with ScrapeMe website.
Playwright scraping typically requires developers to supply the browser with a desired destination URL and then use selectors to access specific DOM elements on the page.
The choice of selectors often depends on the location of the targeted element and the web architecture of the page. On pages with simple web architecture, it can be easily scraped via their unique identifiers. However, be prepared to search for your selector in nested structures.
Here, we'll try to get values for three variables (product,price, andimg_link) using theelement_handle.query_selector(selector)method to search for a corresponding CSS selector. Try selecting one of the Pokémon and viewing the data behind it in the DevTools browser.
Since each element is in the scope of the CSS tagon our web page, with the same class name ("li.product"), we'll first create a common variableitemthat contains all the presented items.
items = await page.query_selector_all("li.product")

for i in items:
	scraped_element = {}

	# Product name
	el_title = await i.query_selector("h2")
	scraped_element = await el_title.inner_text()

	# Product price
	el_price = await i.query_selector("span.woocommerce-Price-amount")
	scraped_element = await el_price.text_content()
Copied!
Then, looking closer at the selectors, you'll see that each variable has its own identifier assigned, such as"h2"forproduct,"span.woocommerce-Price-amount"for productprice, anda.woocommerce-LoopProduct-link.woocommerce-loop-product__linkfor theimageURL. That's why we'll call the query selection method again to find and extract the data values we're analyzing.
It's interesting to note that sometimes, with a JavaScript-based website, a scraper might return data long before the page is fully loaded. But, implementingawait, we guarantee this won't happen. The Playwright web scraper will work only if the specified elements are fully loaded.
# Import libraries to deploy into scraper
import asyncio
from playwright.async_api import Playwright, async_playwright

# Start with playwright scraping here:
async def scrape_data(page):
	scraped_elements =
	items = await page.query_selector_all("li.product")

	# Pick the scraping item
	for i in items:
		scraped_element = {}

		# Product name
		el_title = await i.query_selector("h2")
		scraped_element = await el_title.inner_text()

		# Product price
		el_price = await i.query_selector("span.woocommerce-Price-amount")
		scraped_element = await el_price.text_content()

		scraped_elements.append(scraped_element)
	return scraped_elements


async def run(playwright: Playwright) -> None:
	# Launch the headed browser instance (headless=False)
	# To see the process of playwright scraping
	# chromium.launch - opens a Chromium browser
	browser = await playwright.chromium.launch(headless=False)

	# Creates a new browser context
	context = await browser.new_context()

	# Open new page
	page = await context.new_page()

	# Go to the chosen website
	await page.goto("https://scrapeme.live/shop/")
	data = await scrape_data(page)

	print(data)

	await context.close()
	# Turn off the browser once you finished
	await browser.close()


async def main() -> None:
	async with async_playwright() as playwright:
		await run(playwright)


asyncio.run(main())
Copied!
Источник: https://lajfhak.ru-land.com/novosti/state-web-scraping-2023-challenges-web-scraping