Как изменить интерпретатор в Visual Studio Code. How To Switch Python Interpreters In Visual Studio Code
- Как изменить интерпретатор в Visual Studio Code. How To Switch Python Interpreters In Visual Studio Code
- Расширение Python для Visual Studio Code. Editing Python in Visual Studio Code
- Как установить pip в Visual Studio Code. Installing a Python Library in Visual Studio Code - Windows
- Как установить Python в Visual Studio Code. Getting Started with Python in VS Code
- Как запустить программу в Visual Studio Code. Как запустить код в Visual Studio Code
- Как установить модуль Python в Visual Studio Code. Installing Python Packages For Visual Studio Code On macOS
- Как запустить код Python в Visual Studio Code. Python + Visual Studio Code = успешная разработка
- Vscode Python настройка. General Python settings
Как изменить интерпретатор в Visual Studio Code. How To Switch Python Interpreters In Visual Studio Code
Sometimes, you need to work on different versions of a programming language and switch back and forth between the interpreters.
Visual Studio Code provides an easy way to manage many interpreters for Python. We will be working on two versions of Python for this article, but same techniques are valid for other programming languages like C, C#, or JavaScript.
Install Python Versions – If Not Installed Already
First, you have to install the python versions that you want to work on your pc.
You can either download and install the Python from the official site or use the visual studio installer.
Below we use the later one, assuming the visual studio code is already installed on your computer. If VSC is not ready, check out this installation guide .
So we will go ahead and install Python 2.7 and Python 3.7.
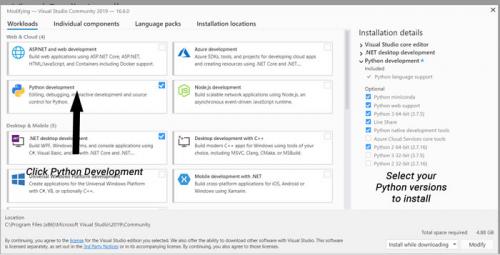
- Use the search bar in Windows and run “Visual Studio Installer.”
- Click on Modify Button
- Click on Python Development in the Workload tab
- Choose the Python versions to install
- Click Modify
The install will take a while, depending on the components you have chosen to install.
Learn how to find duplicate values in a list in Python .
How to switch Interpreter in VSC
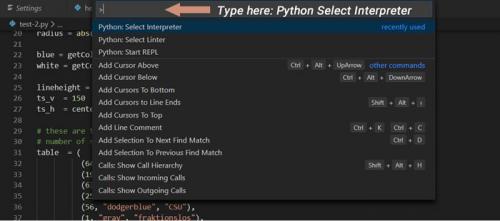
Now, we are ready to talk about how we can switch interpreters from VSC. We need to open the Command palette to change the interpreter.
After Visual Studio Code is opened, use one of the methods below to trigger the command palette.
Method #1
- Either click on the Menu and Command Palette or use the shortcut CTRL+SHIFT+P
- The command palette will be displayed on top of VSC.
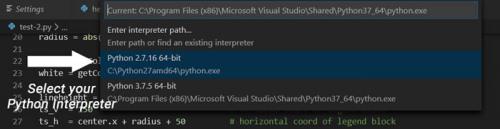
- Type the command “python select int…” and choose the “Python: Select Interpreter” from the list.
- Choose the language option you prefer
Method #2
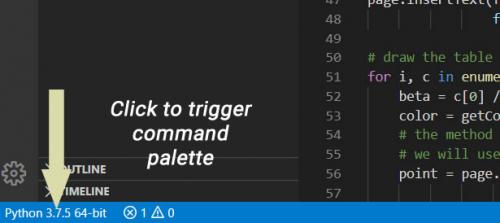
An even shorter way is to use the text at the bottom left corner, displaying the current active python version. When you click on this text, it will open the command palette and list all the python versions available in your environment. Again, just click on the version you want to work on.
How to Run Different Python Versions in Terminal Window
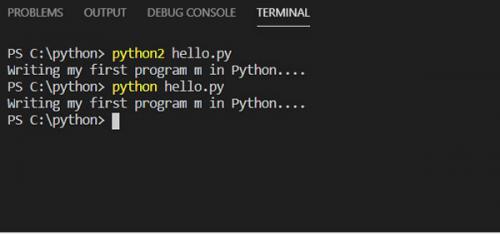
In our case above, we have two python versions installed on our system. If we run the command “python hello.py” from the terminal window, the system will always run the same interpreter if we don’t explicitly define the full path of “python.exe” .
Which one of the python versions run depends on the which one is listed first in environment variables? In other words, the one that Windows OS finds first will take precedence to compile the code.
To run the python 2.7 interpreter, we must use the full path.
C:\Python27amd64\python.exe c:\pythoncode\hello.py
If we run the commandpython, depending on which version path is listed first in environment variables, that would take the precedence to run the code.
python c:\pythoncode\hello.py– python 3.7 will compile the code.
One approach to solve this could be changing the file name of “exe” for both interpreters (or just one of them).
- Go to python 2 directory and change the
python.exetopython2.exe - Set the system Path environment variable to python 2 folder path (if already not set)
If you set the environment variable, you need to restart the windows for the path variable to be active.
Now, we can run whichever version we want from any command prompt.
Расширение Python для Visual Studio Code. Editing Python in Visual Studio Code
Visual Studio Code is a powerful editing tool for Python source code. The editor includes various features to help you be productive when writing code. For more information about editing in Visual Studio Code, seeand.
Autocomplete and IntelliSense
IntelliSense is a general term for code editing features that relate to code completion. Take a moment to look at the example below. When print is typed, notice how IntelliSense populates auto-completion options. The user is also given a list of options when they begin to type the variable named greeting .
Autocomplete and IntelliSense are provided for all files within the current working folder. They're also available for Python packages that are installed in standard locations.
For more on IntelliSense generally, see.
Tip : Check out the IntelliCode extension for VS Code . IntelliCode provides a set of AI-assisted capabilities for IntelliSense in Python, such as inferring the most relevant auto-completions based on the current code context. For more information, see the IntelliCode for VS Code FAQ .
Customize IntelliSense behavior
Enabling the full set of IntelliSense features by default could end up making your development experience feel slower, so the Python extension enables a minimum set of features that allow you to be productive while still having a performant experience. However, you can customize the behavior of the analysis engine to your liking through multiple settings.
Enable Auto Imports
Pylance offers auto import suggestions for modules in your workspace and/or packages you have installed in your environment. This enables import statements to be automatically added as you type. Auto imports are disabled by default, but you can enable them by settingpython.analysis.autoImportCompletionstotruein your settings.
import matplotlibas a suggestion, but not python.analysis.packageIndexDepthssetting (check out theto learn more). User defined symbols (those not coming from installed packages or libraries) are only automatically imported if they have already been used in files opened in the editor. Otherwise, they will only be available through the.Enable IntelliSense for custom package locations
To enable IntelliSense for packages that are installed in non-standard locations, add those locations to thepython.analysis.extraPathscollection in yoursettings.jsonfile (the default collection is empty). For example, you might have Google App Engine installed in custom locations, specified inapp.yamlif you use Flask. In this case, you'd specify those locations as follows:
Windows:
macOS/Linux:
For the full list of available IntelliSense controls, you can reference the Python extensionand.
You can also customize the general behavior of autocomplete and IntelliSense, even disable the features completely. You can learn more in.
Troubleshooting IntelliSense
For autocomplete and IntelliSense issues, check the following causes:
| Cause | Solution |
|---|---|
| Pylance seems slow or is consuming too much memory when working on a large workspace. | If there are subfolders you know can be excluded from Pylance's analysis, you can add their paths to thepython.analysis.excludesetting to see if performance improves. Alternatively, you can try settingpython.analysis.indexingtofalseto disable Pylance's indexer ( Note : this will also impact the experience of completions and auto imports. Learn more about indexing in). |
| Pylance is only offering top-level symbol options when adding imports. | Try increasing the depth to which Pylance can index your installed libraries through thepython.analysis.packageIndexDepths. Check. |
| The path to the python interpreter is incorrect | |
| The custom module is located in a non-standard location (not installed using pip). | Add the location to thepython.autoComplete.extraPathssetting and restart VS Code. |
Как установить pip в Visual Studio Code. Installing a Python Library in Visual Studio Code - Windows
In this quick blogpost, I will share the steps that you can follow in order to install a Python library using pip through either theTerminalor aJupyter Notebookin Visual Studio Code (VSCode) on a Windows computer.
Pre-requisites
In order to complete the steps of this blogpost, you need to install the following in your windows computer:
Visual Studio Code: you can find the steps to install it here . Python Extension for Visual Studio Code: you can find the steps to install it here . Python Interpreter: you can find the steps to install it here .Installing a Python Library Using the Terminal in VSCode
1) Accessing Visual Studio Code Terminal
- Open VSCode application

- Go to the
Terminalmenu and selectNew Terminal.

- A new
terminal(PowerShell based) window is opened.

2) Importing a Python Library
- Run the following command to validate that pip is installed in your computer.
pip --version

- Let us say that you want to install
PandasPython library. - Run the following command
pip install pandas

- Create a Jupyter Notebook following the steps of My First Jupyter Notebook on Visual Studio Code (Python kernel)
- Run the following command to validate that pip is installed in your computer.
!pip --version - Let us say that you want to install
PandasPython library. - Run the following command.

Installing a Python Library Using a Jupyter Notebook in VSCode
1) Creating a Jupyter Notebook in VSCode

2) Importing a Python Library


Как установить Python в Visual Studio Code. Getting Started with Python in VS Code
This tutorial introduces you to VS Code for Python development - primarily how to edit, run, and debug code through the following tasks:
- Write, run, and debug a Python "Hello World" Application
- Write a simple Python script to plot figures within VS Code
This tutorial is not intended to teach you Python itself. Once you are familiar with the basics of VS Code, you can then follow any of thewithin the context of VS Code for an introduction to the language.
If you have any problems, you can search for answers or ask a question on the.
Prerequisites
To successfully complete this tutorial, you need to first setup your Python development environment. Specifically, this tutorial requires:
- Python 3
- VS Code
Install Visual Studio Code and the Python extension
If you have not already done so, install VS Code .
Next, install the Python extension for VS Code from the Visual Studio Marketplace. For additional details on installing extensions, see Extension Marketplace . The Python extension is named Python and it's published by Microsoft.
Install a Python interpreter
Along with the Python extension, you need to install a Python interpreter. Which interpreter you use is dependent on your specific needs, but some guidance is provided below.
Windows
Install. You can typically use the Download Python button that appears first on the page to download the latest version.
Note : If you don't have admin access, an additional option for installing Python on Windows is to use the Microsoft Store. The Microsoft Store provides installs of supported Python versions .
For additional information about using Python on Windows, see
macOS
The system install of Python on macOS is not supported. Instead, a package management system likeis recommended. To install Python using Homebrew on macOS usebrew install python3at the Terminal prompt.
Note On macOS, make sure the location of your VS Code installation is included in your PATH environment variable. Seefor more information.
Linux
The built-in Python 3 installation on Linux works well, but to install other Python packages you must installpipwith.
Other options
Data Science : If your primary purpose for using Python is Data Science, then you might consider a download from Anaconda . Anaconda provides not just a Python interpreter, but many useful libraries and tools for data science.
Windows Subsystem for Linux : If you are working on Windows and want a Linux environment for working with Python, the Windows Subsystem for Linux (WSL) is an option for you. If you choose this option, you'll also want to install the WSL extension . For more information about using WSL with VS Code, see VS Code Remote Development or try the Working in WSL tutorial , which will walk you through setting up WSL, installing Python, and creating a Hello World application running in WSL.
Verify the Python installation
To verify that you've installed Python successfully on your machine, run one of the following commands (depending on your operating system):
Linux/macOS: open a Terminal Window and type the following command:
python3 --version
If the installation was successful, the output window should show the version of Python that you installed.
Note You can use the
Start VS Code in a workspace folder
.vscode/settings.json, which are separate from user settings that are stored globally.Using a command prompt or terminal, create an empty folder called "hello", navigate into it, and open VS Code (code) in that folder (
mkdir hello cd hello code .
Note : If you're using an Anaconda distribution, be sure to use an Anaconda command prompt.
Alternately, you can run VS Code through the operating system UI, then use File > Open Folder to open the project folder.
Select a Python interpreter
Python is an interpreted language. Thus, in order to run Python code and get Python IntelliSense, you must tell VS Code which interpreter to use.
kb(workbench.action.showCommands)), start typing the Python: Select Interpreter command to search, then select the command. You can also use theoption on the Status Bar if available (it may already show a selected interpreter, too):The command presents a list of available interpreters that VS Code can find automatically, including virtual environments. If you don't see the desired interpreter, see.
Как запустить программу в Visual Studio Code. Как запустить код в Visual Studio Code
Один из самых популярных редакторов исходного кода Visual Studio Code очень удобен для начинающих. Удобный интерфейс и расширенные возможности привлекают как начинающих, так и опытных программистов.
Если вы новичок в VS Code и ищете упрощенное руководство по запуску кода, вы попали по адресу. Мы расскажем вам о настройке необходимого программного обеспечения и выполнении кода с использованием знакомых языков, таких как C/C++ и Python.
Установка плагина C++
- Откройте VS Code.
- Выберите значок просмотра расширений на панели активности или используйте комбинацию клавиш (Ctrl+Shift+X).
- Введите в строку поиска 'C++'.
- Установите плагин.
После установки расширения, при открытии или создании *.cpp файла у вас будет подсветка синтаксиса, интеллектуальные завершения (IntelliSense), а также проверка ошибок.
Установка компилятора
C++ - компилируемый язык, то есть исходный код программы должен быть переведен (скомпилирован), прежде чем он будет запущен на компьютере. VS Code - это, прежде всего, редактор, и для выполнения большей части рабочего процесса разработки он полагается на инструменты командной строки. Расширение C/C++ не включает компилятор C++ или отладчик. Нужно будет установить эти инструменты или использовать уже установленные на вашем компьютере.
Возможно, компилятор и отладчик C++ уже есть в вашей учебной или рабочей среде разработки. Узнайте у своих преподавателей или коллег, как установить рекомендуемый набор инструментов C++ (компилятор, отладчик, проектную систему, линтер).
На некоторых платформах, таких как Linux или macOS, компилятор C++ уже установлен. В большинстве дистрибутивов Linux установлен GNU Compiler Collection (GCC), а пользователи macOS могут получить инструменты Clang вместе с Xcode.
- Установите MinGW
- Выберите нужный компилятор, потом перейдите в вкладкуinstallationи нажмитеapply changeдля сохранения настроек. Компилятор начнет скачиваться.
Установка компилятора
- Нужно, чтобы Windows распознал установленный компилятор. Для этого зайдите в папку где он установлен, обычноC:\MinGW\bin.
Вам необходимо найти вкладку "переменные среды". Для этого зайдите в мой компьютер, щелкните вкладку "свойства системы" => "дополнительные параметры системы" => "переменные среды". - Перейдите в раздел Системные переменные и нажмите создать. Добавьте новую переменную среды C:\MinGW\bin. Сохраните.
- Но и это еще не все =). Теперь вы можете написать свою программу в редакторе кода. Но запустить еще не сможете, осталось сделать файл сборки. Для этого нажмите компбинациюCTRL+SHIFT+B=>Создать файл tasks.json из шаблона => others.
- В json файл вставьте данный код
Создание новой пременной в PATH
{ "version": "2.0.0", "tasks": , "group": { "kind": "build", "isDefault": true } } > }
Где main.cpp - имя вашего файлы.
При сохранении файла, копилятор скомпилирует программу и можно будет запустить ее в терминале.
Как компилировать C/C++ в Visual Studio Code на Windows? Запуск Python кода
Простой способ запуска Python и он не требует никакой настройки:
Установите расширениеCode Runner.
Откройте файл кода Python в текстовом редакторе.
Чтобы запустить код Python:
- используйте сочетание клавиш Ctrl + Alt + N;
- или нажмите F1, а затем выберите Run Code (Запуск кода);
- или щелкните правой кнопкой мыши в текстовом редакторе и выберите Run Code в контекстном меню редактора;
- или нажмите кнопку Run Code в меню заголовка редактора.
Чтобы остановить запущенный код:
- используйте сочетание клавиш Ctrl + Alt + M
- или нажмите F1, а затем выберите Stop Code Run
- или щелкните правой кнопкой мыши на выходном канале и выберите Stop Code Run в контекстном меню.
Запуск питон кода
Если вы хотите добавить путь к Python, вы можете перейти в меню Файл → Предпочтения → Настройки и добавить путь к Python, как показано ниже:
"code-runner.executorMap":
{
"python": "\"C:\\\Program Files\\\\Python35\\\python.exe\" -u"
}
Если вы уже установили расширение Python и вручную настроили интерпретатор, вы можете настроить ваш файл settings.json следующим образом:
{
"python.pythonPath": "C:\\\\python36\\\\python36.exe",
"code-runner.executorMap":
{
"python": "$pythonPath -u $fullFileName".
}
}
Как запустить HTML, JS
Html файл вы можете открыть с помощью браузера, VS code может только редактировать содержимое документа.
Как установить модуль Python в Visual Studio Code. Installing Python Packages For Visual Studio Code On macOS
Earlier, we have seen how to. The next important item you have to know is how to install packages for python on VS Code. For installing the packages, you have to choose the environment whether it’s global or virtual or conda. As a best practice, it is recommended to use the virtual environment for installing packages to be used for python project or workspace in VS Code. Here we will see how to create a virtual environment, install the packages and use them.
Tools & Technologies Used
- Python (3.7.3)
- Visual Studio Code (1.36.0)
- macOS Mojave (10.14.5)
To start with, we will create a virtual environment.
Creating Virtual Environment
- Search and start Terminal: Create New Integrated Terminal . The terminal panel will open at the bottom.
Как запустить код Python в Visual Studio Code. Python + Visual Studio Code = успешная разработка
Суперсет Python и Visual Studio Code в действии! Полное руководство по настройке и началу работы на лучшем языке в лучшем редакторе.
от– легкий и удобный редактор кода, доступный на всех платформах и невероятно гибкий. Это отличный выбор для программирования на Python.
В этой статье мы рассмотрим способы установки и настройки максимально эффективной рабочей среды для разработки.
Статья предназначена для программистов, уже имеющих опыт работы с Python и установивших на свою рабочую машину интерпретатор этого языка программирования (Python 2.7, Python 3.6/3.7, Anaconda или другой дистрибутив).
Установка Python – дело несложное: вы найдете подробное пошаговое руководство для всех популярных ОС. Помните, что в разных операционных системах интерфейс VS Code может немного различаться.
Установка и настройка Visual Studio Code для разработки на Python
Сразу же отметим, что VS Code не имеет практически ничего общего с его знаменитым тезкой Visual Studio.
Редакторна любую платформу: наесть подробные инструкции для ,и.
Продукт ежемесячно обновляется и улучшается. В него из коробки встроена поддержка нескольких языков и удобная.предельно прост и понятен.
VS Code + Python
С 2018 года есть. Наблюдать за развитием отношений этой пары можно в.
Основные возможности редактора:
- Поддержка Python 3.4 и выше, а также Python 2.7
- Автоматическое дополнение кода с помощью
- conda и виртуальных сред
- Редактирование кода ви
А вот пара полезных подборок для прокачки Python-скиллов:
- для Atom, Sublime Text, Emacs, Vim, PyCharm и множества других редакторов
- Настраиваемые
- для множества языков, включая русский
В редакторе есть и полезные фичи, не связанные напрямую с языком:
И еще несколько крутых возможностей для полного счастья:
- GitLens – множество полезных функций Git прямо в редакторе, включая аннотации blame и просмотр репозитория.
- между различными устройствами с помощью GitHub.
- Удобная работа с.
Чтобы найти и установить необходимые расширения и темы, нажмите на иконку Расширения на левой панели. Можно искать по ключевым словам и сортировать результаты поиска.
Найдите расширение Python и установите его, чтобы продолжить настройку редактора.
Файлы конфигурации
В Visual Studio Code вы легко можете. Здесь есть параметры пользователя, которые являются глобальными, и параметры рабочей области – локальные для конкретных папок или проектов. Локальные настройки сохраняются в виде .json-файлов в папке .vscode .
Новый проект на Python
Чтобы открыть новый файл, нужно зайти в меню Файл и выбрать пункт Создать или нажать горячую комбинацию клавишCtrl+N.
Еще в редакторе есть полезная палитра команд, которую можно вызвать сочетаниемCtrl+Shift+P. Для создания нового файла введите в появившемся поле File: New File и нажмитеEnter.
Какой бы способ вы ни выбрали, перед вами должно открыться вот такое окно:
Здесь уже можно вводить код вашей программы.
Начинаем кодить
Для демонстрации возможностей редактора напишем "" – известный алгоритм для нахождения простых чисел до некоторого предела. Начнем кодить:
sieve =
На экране это будет выглядеть примерно так:
Подождите, что-то не так. Почему-то VS Code не выделяет ключевые слова языка, не дополняет, не форматирует и вообще ничего полезного не делает. Зачем он вообще такой нужен?
Без паники! Просто сейчас редактор не знает, с каким файлом он имеет дело. Смотрите, у него еще нет названия и расширения – только какое-то неопределенное Untitled-1 . А в правом нижнем углу написано Plain Text (простой текст).
Vscode Python настройка. General Python settings
| condaPath | "conda" | Path to thecondaexecutable. |
| defaultInterpreterPath | "python" | |
| interpreter.infoVisibility | "onPythonRelated" | Controls when to display the selected interpreter information on the status bar. You can set it to "always"if you'd like it to always show on the status bar, or"never"to hide it entirely. |
| pipenvPath | "pipenv" | Path to the pipenv executable to use for activation. |
| venvFolders | | Paths to folders where virtual environments are created. Depending on the virtualization tool used, it can be the project itself: .\envs,~/.virtualenvs, and so on. |
| envFile | "${workspaceFolder}/.env" | Absolute path to a file containing environment variable definitions. See. |
| globalModuleInstallation | false | Specifies whether to install packages for the current user only using the--usercommand-line argument (the default), or to install for all users in the global environment (when set totrue). Ignored when using a virtual environment.For more information on the --userargument, see. |
| poetryPath | "poetry" | Specifies the location of the Poetry dependency manager executable, if installed. The default value"poetry"assumes the executable is in the current path.The Python extension uses this setting to install packages when Poetry is available and there's a poetry.lockfile in the workspace folder. |
| terminal.launchArgs | | Launch arguments that are given to the Python interpreter when you run a file using commands such as Python: Run Python File in Terminal . In the For example, for the arguments --a --b --c {"value1" : 1, "value2" : 2}, the list items should beNote that VS Code ignores this setting when debugging because it instead uses arguments from your selected debugging configuration in launch.json. |
| terminal.executeInFileDir | false | Indicates whether to run a file in the file's directory instead of the current folder. |
| terminal.activateEnvironment | true | Indicates whether to automatically activate the environment you select using the Python: Select Interpreter command when a new terminal is created. For example, when this setting is trueand you select a virtual environment, the extension automatically runs the environment's activate command when creating a new terminal (source env/bin/activateon macOS/Linux;env\scripts\activateon Windows). |
| terminal.activateEnvInCurrentTerminal | false | Specifies whether to activate the currently open terminal when the Python extension is activated, using the virtual environment selected. |
| terminal.focusAfterLaunch | false | Whether to switch the cursor focus to the terminal when launching a Python terminal. |
| logging.level | error | |
| experiments.enabled | true | Enables A/B experiments in the Python extension . If enabled, you may be provided with proposed enhancements and/or features. |